159 Beyond Black on White: Document Design and Formatting in the Writing Classroom
by Michael J. Klein and Kristi L. Shackelford
You’ve received your first assignment in a college writing course. You’ve created an outline, done the necessary research, and written a first draft of your paper. Now it’s time for you to revise your work so you can submit the paper. However, writing a paper for a course involves more than simply generating content and turning it into your instructor. Equally important as the words you write is how the appearance of your document influences the way readers interpret your ideas.
Most people think of design as the arrangement of images on the page. This is only half true: Graphics can convey concepts that you can’t express in writing. If you were writing an article about an oil spill and the damage it caused, one powerful photograph could make your point more persuasively than pages of writing. Good document design integrates the words on the page with appropriate imagery to fully illustrate your meaning. An image of the Deep Horizon oil spill won’t have the same impact if the image isn’t coupled with a sentence about the scope of the spill.
An often-overlooked element of design is the visual treatment of text itself. In this definition of text, text does not include your word choice or the structure of your argument. Instead, it refers to the look of the words on the page. Are all the fonts the same? Are key ideas written in a text larger than other text? Are some words in bold? All of these choices influence the way your document looks and is perceived by your readers. Depending on the type of paper your instructor has assigned and the preparation rules or style guide required, subtle variations in text might be your only design option.
In a typical first-year writing course, you’ll be focusing—of course—on writing. If the intent of writing is to communicate an idea, the way you present your writing is also important. You can greatly improve a standard research paper on climate change with the addition of an image showing differences in ice caps over a period of years. You can strengthen data supporting your position in an opinion paper if you present it in a graph rather than a narrative format. However, include graphics in written assignments with care: they should supplement, not replace, your writing. When you are creating, don’t think of design features as only images. Remember that visual design applies to the style of the text you use to convey ideas. The remainder of this chapter focuses on the use of text as a design element.
What You Should Know about Design Choices and Elements
You can talk about design in a multitude of ways. What some designers call white space, for example, others call negative space. In both cases, they are referring to areas of a page free from text or objects, such as the white space that makes up the margins around the text of this paragraph. A designer may talk about the use of alignment in a design, while someone else will describe how textual elements “line up” on a page. All theories and methods of design include the same basic ideas, just expressed in different terms. The names of elements on a page are much less important than their function. The definitions below will help you understand the way we use these terms.
Text and Type
Typeface refers to the look of your text. It typically includes the font family (e.g., Times New Roman), the type size (e.g., 12 point) and type emphasis (e.g., bold). Spacing is the amount of space around a line of text within a document. The amount of space between lines of text is called leading (pronounced led) or line spacing. Leading is typically the size of the font plus two points. For example, standard leading for 12-point type is 14 points, indicated as 12/14 point; this paragraph uses 11 point Adobe Garamond Pro with 13.2 point leading. Increasing the amount of leading, or size of line spacing, can increase readability. Large amounts of text are often set with a leading of twice the text (12/24 point), also called double-spacing.
Images
The visual elements of a design range from simple boxes to the use of color photographs. Designers often use the term “images” to refer to the wide range of visual elements available—photographs, line drawings, technical illustrations, graphs, charts, and so on. Not all images are appropriate for all uses. A color photo of the beach, for instance, may have more persuasive power than a black-and-white drawing because the photograph evokes a more complete and personal reaction. A technical illustration that allows a reader to see the inside of a device can demonstrate the proper assembly of equipment in more detail than an actual photograph. In some cases, though, images can distract from the meaning of your text. You should not include random clip art of a tree, for example, to supplement a paper on the importance of environmental sustainability. In contrast, you may strengthen your position on environmental sustainability with a graph showing the cumulative effects of non-recycled materials.
Design Elements
Like the combination of text and images, the integration of four key design elements—Contrast, Repetition, Alignment and Proximity— gives a design power. You can remember these elements by the acronym CRAP. Don’t let the name influence you, though—following these principles is one of the best ways to ensure your document looks its best. It is sometimes difficult to differentiate among these concepts because they influence each other.
Contrast
Contrast refers to the visual differences in elements on a page. These differences highlight the significance of the individual items, as well as draw the reader’s attention to different areas of a page. In a magazine layout, for example, the largest photograph is more noticeable because of its larger size in comparison to others on a spread. Color in a design can also provide noticeable contrast.
In text, you see contrast through different uses of formatting options. This might include choosing different typefaces to visually separate headings from your main text. Contrast may also be visible in the differing sizes or emphasis applied to a text. If you apply bold formatting to keywords in your document, they stand out from others and indicate that they are significant. If every other word in your document is bold, however, the effect of the contrast is lost. A similar effect occurs when you overuse a highlighter when marking a textbook: important information gets lost rather than being easier to find.
Look at the first page of this chapter. You can immediately see the name “Document Design” and recognize that it is the title of the chapter. Your eye is immediately drawn to it because it is the biggest item on the page. Just below the title, the authors’ names are in smaller, italicized text. The contrast between the size and emphasis in the two lines of text quickly illustrates that they are providing different information.
Repetition
Repetition involves the use of consistency to visually group multiple items that express similar ideas or are somehow related. You can apply this design element to graphics, including the use of shapes and color. For example, many of your textbooks may include a section summarizing key ideas from the text. By placing all summaries in a similarly shaped box or highlighted by the same color, you can tell that these items have something in common. Once you realize that all summaries in your political science textbook are in green boxes, you can find them at glance.
You can apply repetition simply by formatting text in different ways. When you look at a restaurant menu, you’ll see that the larger categories—like “Appetizers” and “Desserts”—are presented in the same font and size as each other, which is different from the listing of the food items themselves. This repeated format shows that those categories are equivalent. It also indicates that a new section is beginning, as do the headings that divide sections of this chapter. In papers written for a class, you express repetition in text primarily through placement, such as always putting page numbers in the same place on the page. On a Works Cited page, the organization of citation materials (such as the author’s name and book title) makes information easier to locate. Repetition makes your intent more obvious to readers.
Repetition lets you quickly glance through this book and find information, even in sections you haven’t already read. To find the first page of a chapter, you look for a large title with lots of white space above it. If you’re looking for a specific page in the book, you know to look at the outside corners to locate the page numbers.
Alignment
In design, alignment refers to the placement of elements on a page. While everything on a page is aligned in that it has been placed somewhere, some alignment strategies are better than others. You can think of it as asking a sick friend, “Do you have a temperature?” Of course, everyone has a temperature; what you’re asking is if your friend has an elevated or abnormal temperature. In the same way, when document designers talk about alignment, they typically mean consistent alignment. For example, text that is left justified or graphics that run along the edge of the page are considered properly aligned.
Aligning elements creates a cleaner, more attractive design and emphasizes the consistency of information on a page. Alignment also helps readers access and process information in a publication. Appropriately aligned text clarifies for the reader where ideas begin and end. It also increases readability by allowing the reader’s eye to return to a consistent location on the page while reading. Breaking the alignment scheme is also a valuable design tool. When a block quote is indented, it is quickly apparent that the text has a slightly different meaning than the text above and below it.
The text alignment throughout this chapter indicates when a topic is changing and how a large piece of text (the chapter) can be broken into smaller chunks (the sections). Main headings within the text are centered over justified body text. To find the idea you’re looking for, you can look for the centered text and know that a new idea is being introduced.
Proximity
Proximity is the grouping of elements that have something in common. Often a layout involves a single idea, and the designer uses the entire page to place thematically related text and graphics. When multiple ideas are included on a single page, the reader can tell which are related based on how close—or far—they are from each other. An obvious example is a box including a photo and its caption.
In academic writing and formatting, the placement of text often illustrates proximity. You place headings that identify the content of a section directly above that section, cuing the reader to a shift. This proximity also allows readers to quickly find related information based on the heading of a section.
Look at the image labeled as Fig. 1. As soon as you see the graphic, you can look immediately below it, see what it is named and why it is included. What if that label was on the next page? Placing related elements together is an efficient way to make sure they are properly understood.
For More Information
Design texts aren’t just for professional designers! You can find examples of the principles discussed here in a variety of design books. Look for a basic book that covers designing with images and text to learn more. A good one to start with is Robin Williams Non-Designer’s Design Book; many of the ideas in this chapter are based on ones presented in her book.
How You Can Apply These Design Principles
Incorporating design principles into a publication has an immediate and compelling effect. Even text-heavy documents, such as academic papers or resumes, become more appealing and comprehensible with even minor restructuring.
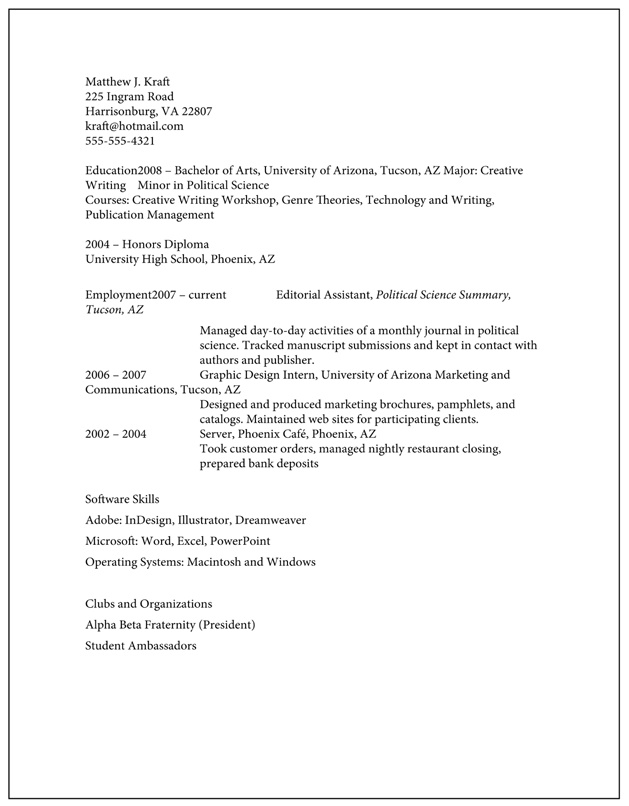
The example in Fig. 140.1 shows an unformatted resume. The lack of repetition, contrast, alignment, and proximity make the document unattractive as well as difficult to follow. There is no way to easily distinguish important information, like the applicant’s name and contact information. Sections run together, and no key ideas are clear.
Fig. 140.2 shows the same content using the previously discussed design elements. The document is more visually appealing as well as being easier to review. Each individual design principle is involved, and their combination leads to a stronger design.
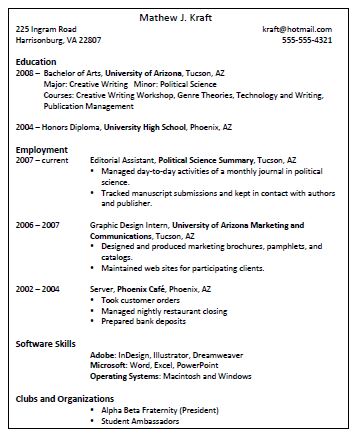
Repetition is shown through the consistent emphasis and text used in the various sections of the resume. There is contrast between the size of the author’s name and the contact information, clearly highlighting the most significant information. School and business names shown in bold create strong contrast within lines of text. Text is firmly and consistently aligned. Text is easy to read from the left justification, and the author’s name is highlighted as the only centered text on the page. Proximity makes finding information simple, as section headings are placed directly above their supporting information.
The Basics of Style Guides
Style guides are collections of conventions on everything from word choice to format gathered into one place and used in writing. Their primary purpose is to ensure that all documents in a given environment adhere to a certain look and consistent use of language, but they serve a much broader purpose.
Style guides eliminate the guesswork in areas of writing that have multiple options. For example, both advisor and adviser are accurate spellings of a word; a style guide specifies which instance is preferred for the document you are writing. Style guides assure consistency in an organization’s publications, such as placing the titles and page numbers in the same area of the page for all documents. Finally, they make reading and comprehension easier for the audience by presenting similar information in similar ways. Readers who want to view the source material you’ve used in a paper, for example, will refer to your list of authors and publications. The format and even the title of this section will vary depending on the style guide you’ve chosen. The “Works Cited” or “Reference” pages provide the information on all referenced documents in a presentation different from the main text, making it easy to identify.
Most academic disciplines follow a style guide. In addition, many companies and academic institutions establish their own style guides to supplement established style guides. In most writing courses, as well as other courses in the humanities, we use the Modern Language Association (MLA) style.
A Primer on MLA Style
The Modern Language Association produced their first “MLA style sheet” in 1951 as a way to ensure consistency within documents shared in the academic community. The style sheet evolved into the first edition of the MLA Handbook in 1977. Now in its seventh edition, the MLA Handbook is the primary source for stylistic choices made in writing for the humanities.
Style guides reflect the items of importance in writing for a particular community. The types and structure in information shown in the MLA style guide differ from those in other disciplines. For example, the American Psychological Association (APA)—used by many of the sciences—has its own style guide. Even popular media, including newspapers and magazines have their own style guide: the Associated Press (AP) guide.
Writers using a specific style guide will emphasize different pieces of information. For example, citations in MLA emphasize the author as primary focus, while the APA style guide features dates (see Fig. 3).
Style guides are dynamic documents, and they change to reflect evolutions in technology for both research and production. When MLA style was first developed, it did not include a style for referencing Internet sources.
Johnson felt that “there was a lack of trust amongst people when it came to money” (234).
Some researchers argue that money creates “a lack of trust amongst people” (Johnson 234).
MLA Style Works Cited
Crowley, Sharon, and Debra Hawhee. Ancient Rhetorics for Contemporary Students. 3rd ed. New York:
Pearson Education, 2004.
Johnson (2003) felt that “there was a lack of trust amongst people when it came to money” (234).
Some researchers argue that money creates “a lack of trust amongst people” (Johnson 2003: 234).APA Style Reference
Crowley, S. & Hawhee, D. (2004). Ancient rhetorics for contemporary students. (3rd ed.) New York, NY:
Pearson Education.
As online media became an increasingly significant means of sharing resources, the style guide was adapted to incorporate references for Web sites, online journals, and print journals retrieved online. Changes in production options for writers and publishers also influenced changes to style guides. When authors typed papers using traditional typewriters, they were unable to use italics to indicate the name of a publication; instead, the underlining of text indicated these documents. Modern word processing programs allow the author to control type at a much more precise level, allowing italics as well as control of spacing and line breaks.
Like most style guides, MLA style changes over time. The guidelines presented here are appropriate for the seventh edition of the MLA Style Guide. You should check to make sure you are using the most current version. In the college courses you take, your individual instructors may impose additional style choices or ones that conflict with the style guide for the academic discipline. Be sure to follow the special style instructions for the assignments in that course.
Applying MLA Style in Your Own Papers
The way you use words and place text on a page influence the audience’s ability to comprehend information. Much the way the shape of a stop sign indicates the same meaning as “STOP” to a driver, readers understand information in part through its placement and format. As a result, there is consistency among the papers submitted within a writing classroom and established journals in an academic field. This consistency allows readers to become accustomed to certain conventions and increases readability. When a professor reviews multiple papers formatted in the same way, for example, she can easily find the author’s name and class section on all of the papers. Likewise, students in an English class will be able to find a source from the information given in an academic journal because they can understand in-text citation and bibliographic reference.
MLA-formatted papers for a class rarely include graphic elements, like illustrations or tables. In fact, MLA style limits the use of design in formatting to ensure that the focus remains on the text. Settings specified by MLA incorporate the design principles reviewed above. The remainder of the chapter discusses MLA formatting of academic papers, like the research papers you’ll develop in your writing classes, as opposed to writing for publication, such as professional journals.
The primary use of repetition in MLA format is to indicate that text formatted in the same way throughout a paper signifies a similar use. Contrast is important in separating distinct sections of a paper from one another. Alignment in MLA increases readability by providing a common starting point for the reader. Proximity helps readers follow related ideas. For example, section headers are located directly over the text they introduce, allowing readers to quickly find information.
Margins
Margins are the distance from the edge of the paper to where the text starts. They define the amount of white space around the text on the page. They are important because they emphasize the text through contrast (black text on a white page) and increase readability through consistent alignment (headings and text line up to the left margin). Margins also contribute to readability by providing a place for the reader’s eyes to rest: they ensure appropriate white space to prevent a page from becoming too dense with text.
The MLA style guide requires specific margins of one inch (1”) on all four sides of a page (see Fig. 4).
See section 4.1 of the MLA Handbook for information on margins.
Typeface and Spacing
Appropriate typeface usage involves all design elements. The repetition of a single font throughout a document shows the reader that each section of the paper is part of a single whole. The strong visual color contrast of black text on a white background increases readability. Black text, for example, is easier to read than gray text, a difference you may notice when your printer is low on ink. Alignment indicates a separation of ideas or the introduction of a new concept. The title of the paper centered over the left-aligned text shows the beginning of the paper’s content. The placement of section titles illustrates proximity. Each one is adjacent to its respective text directly above the first paragraph of a section.
MLA requires a serif font (like Times New Roman) in 12-point type. A serif font is one that has edges or “feet” on the ends of letters. A sans-serif font (like Arial) is straighter, without edges or flares as part of its shape. Serif fonts are traditionally easier to read, though this distinction has decreased as desktop publishing programs and font qualities have improved.
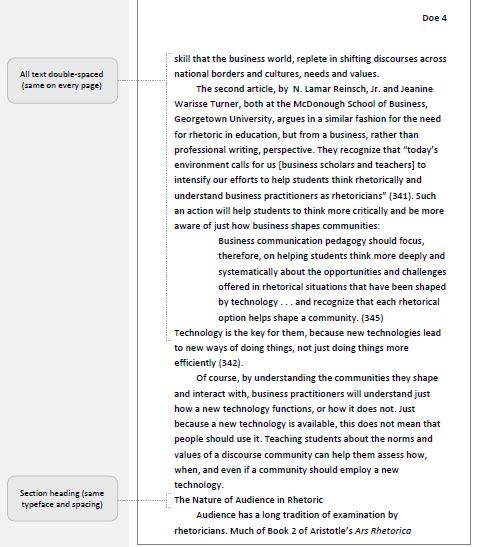
All text, from the initial header through the reference page, must be double-spaced (see Fig. 5). There is no additional spacing before or after headings. Each new paragraph is indented by ½ inch. The consistent spacing within the document makes reading easier as well as providing a reviewer with room for notes. The indention of each paragraph clearly indicates the beginning of a new idea.
See section 4.2 of the MLA Handbook for information on typeface and spacing.
Title and Headings
A title and internal headings help to separate the body of the paper into smaller, more specific, sections. They break text into shorter, more readable sections, or chunk information in the paper into reasonable portions. In addition, headings allow the reader to quickly skim through a document in search of specific ideas. Headings are described in levels, meaning their hierarchal structure in the paper. A second level heading must follow a first level heading. For example, after reading this entire chapter, you can easily find information on a specific element by looking for the appropriate heading.
Within MLA style, the title refers to the entire paper, while headings refer to individual sections within the paper. The contrast in MLA titles and headings comes mainly from alignment. Both students writing in the classroom and professionals writing for publication use MLA style. Limiting the amount of formatting—like adding italics or bold for emphasis—and focusing on alignment helps ensure that headings remain consistent when different fonts are used. The title is centered over the main text; headings are left justified over body text that is indented (see Fig. 5).
See section 4.3 of the MLA Handbook for information on titles and headings.
Headers and Page Numbers
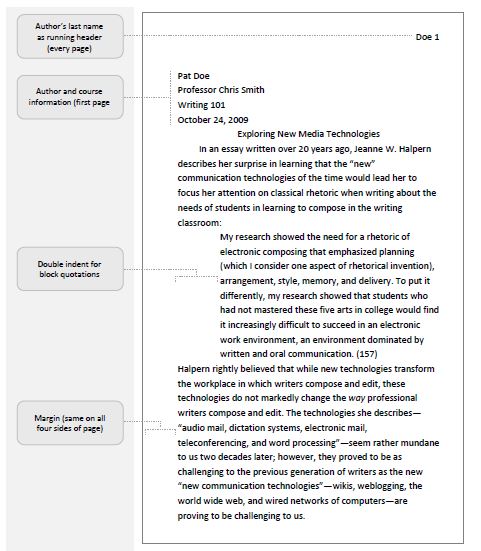
Headers are a user service, providing information to readers regarding their location in the text. The header includes the author’s last name and the page number (see Fig. 4). Because the header information is formatted consistently and placed in the exact location on each page, this use of repetition helps readers easily find and identify document information.
On the initial page of a research paper, the header also includes the author’s name, the date of submission, course instructor’s name and course designation, usually left justified (see Fig. 4). This information, but not its placement, may vary depending on your course. Always check with your professor or refer to handouts provided in class for specifics.
Subsequent pages of the paper require that the author’s last name and page number be placed in the upper, right-hand corner of the page, one-half inch (0.5”) from the top edge of the page and one inch (1”) from the right edge of the paper.
See section 4.4 of the MLA Handbook for information on page numbers.
Illustrations
Illustrations, including photographs, line drawings, maps, or graphs, help your readers better understand the information you are communicating. Sometimes illustrations support the function of the text. For example, we use the illustrations in this chapter to help you better understand the concepts we are writing about. Understanding the importance of graphics would be much harder with no illustrations as support. In other instances, the illustrations themselves are the primary pieces of information. For instance, a simple graph can be far more dramatic and comprehensible than a long paragraph full of numbers and percentages.
With MLA style, illustrations should be labeled Figure (usually abbreviated as Fig.), numbered consecutively, and given a brief caption following the label. As we have done with the illustrations in this chapter, the caption should readily identify the key feature of the illustration. Place the illustration as close as possible to the text where you first reference it to help readers understand why you included it.
Writers frequently use illustrations created by others to supplement their writing. If you find an image on a website, you cannot use it without permission. And while some websites explicitly give permission to use their images, you must still cite the source in your own work.
While you can use others’ properly attributed illustrations, sometimes you will create the illustrations yourself. For example, you may want to capture an image of your computer’s desktop to add to a document about computer systems. To copy a screenshot of your computer to the clipboard, press <Ctrl-Shift-Command> (Apple)-3 on Mac OS X or <Print Screen> on Windows. Once on the clipboard, the image will be available for you to manipulate with an image editing software or paste unaltered into almost any type of graphics program.
While some images may already be exactly the way you need them, most of the time you will need to make changes to images before you can use them. Two free image editing software packages are GIMP— the GNU Image Manipulation Program—for Mac OS X and Windows systems (available at <http://www.gimp.org/>) and Paint.NET for use only on Windows systems (available at <getpaint.net>). Other things to remember when using illustrations:
- Always use visuals of good quality. A bad illustration can distract your reader and lessen the credibility of your argument.
- Don’t distort the image. Keep the image in proportion by holding the <Shift> key as you are adjusting the image in your word processor.
- Make sure the image is of the right quality and resolution. An image that looks great on a website may not look as good when printed. Check the resolution of the image before enlarging it so there is no loss of quality.
- Use the image at the appropriate size. Don’t try to force a full-page PowerPoint slide into a one-inch square space.
- Crop images to remove extraneous material. Keep the focus on the important part of the illustration, just like you do with text. For example, if including a web browser screenshot of a web page in a paper, readers do not need to see the browser window frame or your favorites/bookmarks menu in the visual used in the document.
See section 4.5 of the MLA Handbook for information on working with illustrations.
Conclusion
While not every class, assignment or topic lends itself to the inclusion of graphics, you can still design your documents to be appealing to your reader. Good design choices can also make your document more accessible to your readers. A clean design with graphic and typographical indicators of content gives your readers more opportunities to engage with and understand your intention.
Style guides define typographical and design rules for you as a writer and a reader. MLA is the most commonly used style guide in first-year writing, but most disciplines have their own. All style guides answer the questions you commonly encounter as a writer—Should page numbers be at the top or bottom of the page? How do I cite an article from a magazine’s Web site? When you answer these questions, you can concentrate on the writing itself and developing your ideas. As a reader, you will be able to identify an established style and use it to your advantage. Finding the information you want (paper topics, authors cited) is easier when you know where to look (headings, reference pages). While the reasoning behind the rules in a style guide may not be intuitive, following them leads to better-designed documents.
Discussion
1. What style guides have you used in the past? How did following a style guide influence your writing? In what different writing situations do you think a style guide would be most effective? Least effective?
2. In what ways does the appearance of a document affect your perception of the message and of the author?
3. How can you integrate the design elements of contrast, repetition, alignment and proximity into class assignments? What documents would benefit most from good design principles?
4. How much value does including an image add to a traditional academic paper? What types of images do you think are appropriate? In what ways can images detract from the impact or intent of an academic paper?
Works Cited
Modern Language Association of America. The MLA Handbook for Writers of Research Papers. 7th ed. New York: MLA, 2009. Print.
About the Authors
Michael J. Klein, Assistant Professor of Writing, Rhetoric, and Technical Communication at James Madison University, teaches courses in first year composition, technical communication, and publication management.
Kristi L. Shackelford, the Director of Academic Policy and Curriculum Development at James Madison University, teaches courses for the School of Writing, Rhetoric and Technical Communication including editing and publication management.
